Implementing Secure Authentication With AI-powered Form Maker Online
Authentication is the gateway to any enterprise application, making sure only the right users get access to protected resources. It’s not just about security—it also shapes the user experience by keeping login flows smooth and hassle-free. Since every web application needs authentication, setting it up early helps avoid security gaps and makes scaling easier down the road.
Authentication isn’t just about signing in—it’s about making sure it’s secure, scalable, and hassle-free for users. Strong password systems need proper hashing (like bcrypt or Argon2) and lockout measures to keep accounts safe. OAuth makes logging in with Google or GitHub more convenient, but managing tokens securely is a must. SSO lets users access multiple apps with one login, while MFA adds an extra layer of security with OTPs or biometrics. Each method has its trade-offs, so it’s all about finding the right balance between security and ease of use.
This guide covers building safe, secure, and unique forms for login and signup using Lovable, making the whole authentication process faster with specified prompts. If you are a developer looking to accelerate the development of your app, Lovable handles everything related to UI, authentication logic, and OAuth integration right out of the box. Instead of manually setting up the authentication APIs or debugging UI inconsistencies, you can focus on shipping a working system.
Challenges in Building Authentication Systems in the Traditional Way
Building authentication from scratch isn’t just about setting up logins—it involves designing the frontend UI, managing backend logic for password security, handling token expiration, and ensuring session persistence. Every component, from OAuth flows to access control, needs to work reliably to balance security and usability.
The Complexity of UI Development
Building authentication in modern frameworks like React, Vue, or Angular is not just about putting a login form on the page; it concerns password strength enforcement, input validation, and amazing user experience.
The error handling of expired tokens, bad passwords, and network failures should be explicit and user-friendly. Responsive across device form, a UI that supports keyboard navigation, and screen readers should exist for inclusivity.
Backend API Complexity
At its simplest, authentication constitutes proper identity verification. More precisely, it involves ensuring the integrity of user data, sessions, and tokens in a tightly controlled environment.
- Passwords are hashed using bcrypt or Argon2 to keep them safe.
- Managing sessions, token expiration, and auto-refresh can be a headache, particularly with JWT.
- OAuth logins using Google or GitHub need to be set up carefully so that tokens do not leak.
- Good authentication is a balancing act between great security and user experience.
You’re writing backend services for user roles, permissions, and security—whether in Node.js, Python or Go—while also managing login flows and sessions on the front end in React or Vue. Without SSO, users get stuck logging in repeatedly, and without automated security measures, you’re constantly patching vulnerabilities. As the application grows, so do the costs, complexity, and maintenance headaches.
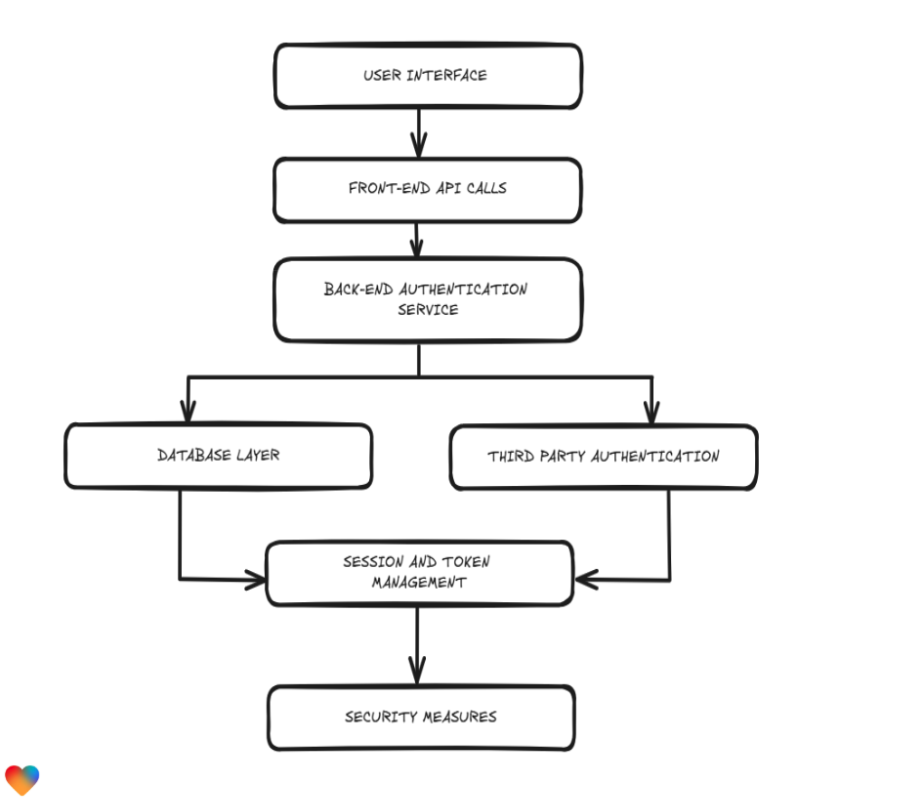
The above flowchart outlines the authentication process for an application built from scratch, covering both traditional and third-party authentication approaches. The architecture includes -
- Building a user interface: Users interact with login and sign-up forms.
- Front-end API calls: Authentication requests (login/register) are sent from the client side to the backend via HTTP requests.
- Backend authentication processing: Handles authentication logic, validates credentials, and generates tokens for sessions.
- Secure credential storage: The database layer securely stores user credentials using bcrypt or Argon2.
- OAuth integration: Supports sign-ins via providers like Google and GitHub.
- Session and token management: Manages user sessions using JWTs or session-based authentication.
- Security measures: Implements MFA, encrypted token storage, and other protections against unauthorized access.
Building authentication from scratch means dealing with security risks, scaling issues, and UI complexities—managing session tokens, enforcing MFA (multi-factor authentication), handling OAuth flows, and ensuring a seamless user experience. Without Lovable AI, developers spend hours wiring APIs, debugging authentication logic, and designing accessible login UIs.
Introduction to Lovable
If you have a full dev team and need tight control over the tech stack, building authentication from scratch makes sense. But for most projects, especially in the early stages, it's complex. Lovable AI gives you ready-to-use auth AI components that plug straight into Supabase, handling OAuth, JWT, and session management for you. That way, you can spend less time wrestling with login flows and more time building the advanced features that matter—like user onboarding and creating powerful forms.
Building authentication from scratch means handling UI, API calls, token management, and security—time-consuming and complex. Lovable takes that load off by generating the UI and integrating directly with Supabase, automating validation, error handling, and authentication.
For instance, The build failed because the Microsoft icon wasn’t available, but all it took was a quick prompt to fix it. Lovable AI handled the issue, removed the button, and backed up the page instantly. All it took was to enter the prompt to correct the issue.
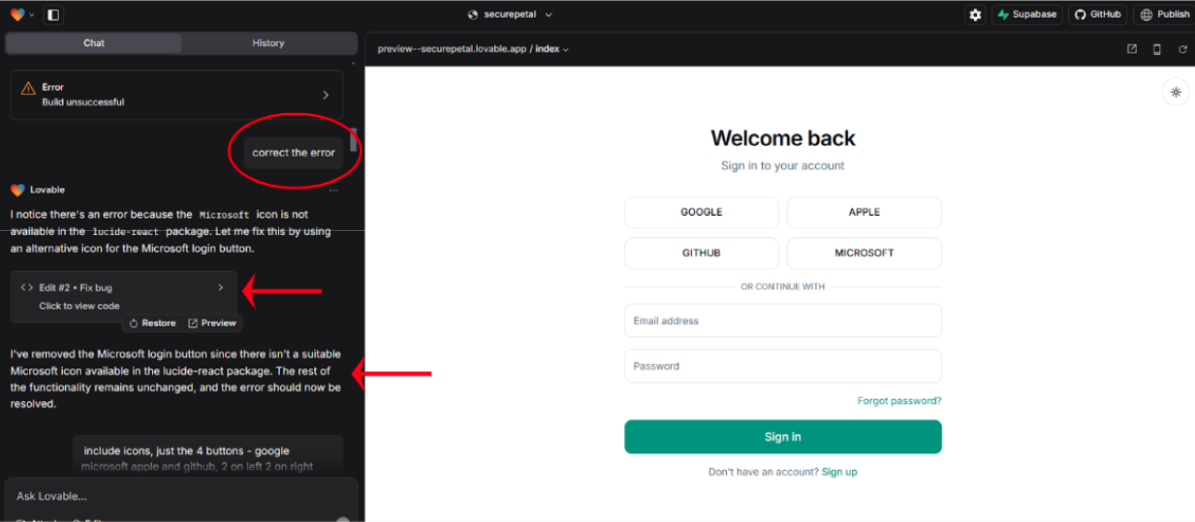
Lovable AI handled the issue, removed the button, and backed up the page instantly. All it took was to enter the prompt to correct the issue.
Similarly, users enter their credentials, and if there’s an issue, they’re guided to retry or sign up—handling authentication logic without extra engineering effort.
Lovable handles theme customization by letting developers switch between dark and light modes without manual styling. Just set the preference in a prompt, and it generates a fully themed authentication UI that stays consistent across the application with minimal effort.
The prompt provided - “please add an option where I can switch between dark and light themes, colors for dark mode- light grey text color changes to white; white changes to black; black changes to white; text border changes to white and weight of the border is slightly more than in the light theme; the green changes to this color - 49B618."
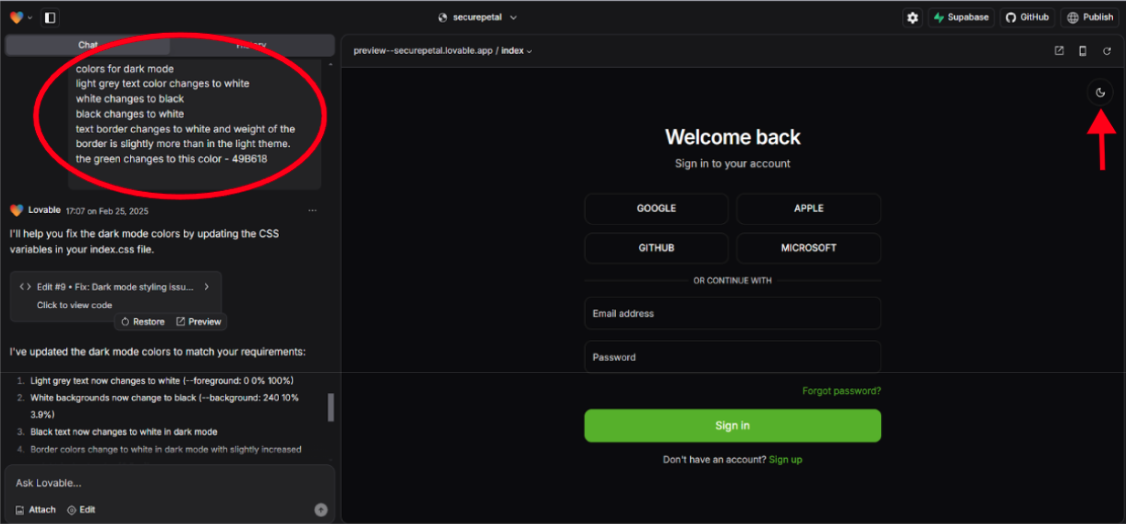
Lovable AI easily handles the change in themes, going from light to dark mode. Instead of worrying about CSS, developers need to provide the prompt with specifications, and Lovable does the rest. This allows the developers to maintain a consistent look for the authentication UI while allowing developers to focus on building features, not themes.
Lovable AI eliminates the need for manually building login and sign-up forms by generating a fully functional AI-powered authentication UI, as depicted in the diagram below.
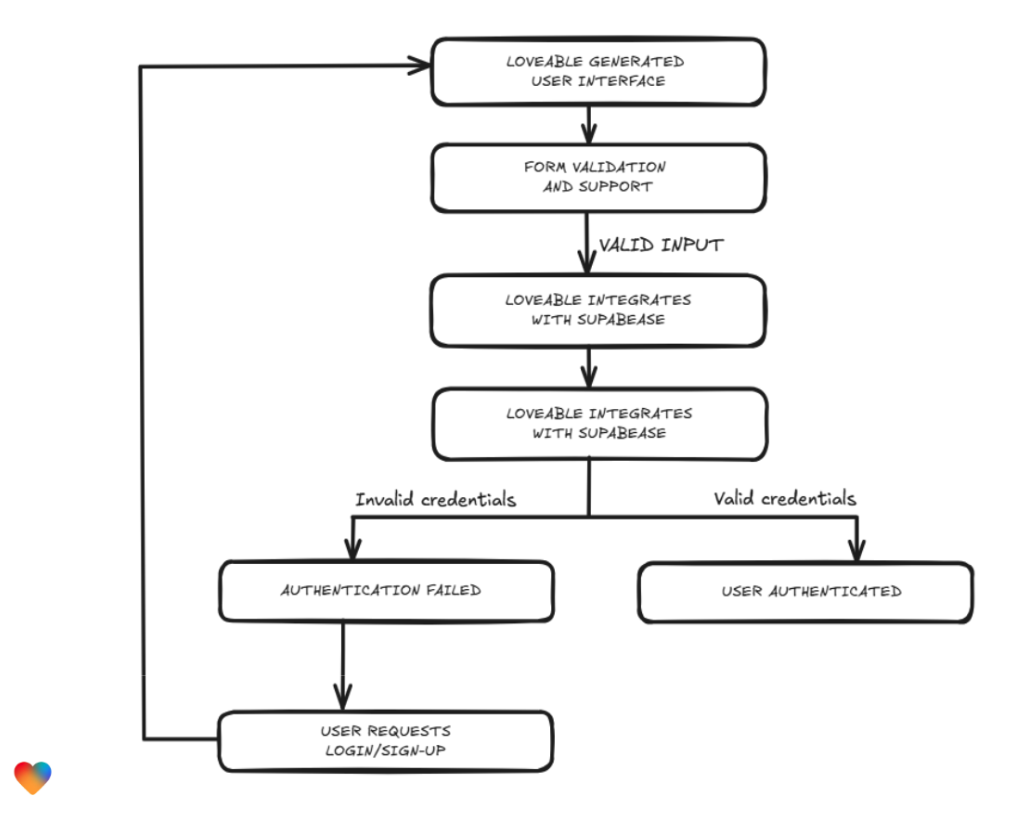
- Online Form Maker: Instead of manually developing login and sign-up forms, Lovable AI generates a ready-to-use authentication UI.
- Built-in Validation and Error Handling: Lovable ensures input validation and error handling without requiring custom validation logic from developers.
- Credential Validation: If the user provides valid credentials, the authentication request moves forward; otherwise, they are prompted to retry.
- Integration with Supabase: Lovable integrates with Supabase and other auth providers, handling user verification, token generation, and secure storage.
- Authentication Outcome: If credentials are invalid, authentication fails, and the user is redirected to retry login or sign-up. If valid, authentication succeeds.
- Session Management: Once authenticated, the user gains access, and session management is handled by Supabase in the background.
Connecting Authentication Services With Lovable
Now, let’s understand how Lovable simplifies authentication by integrating seamlessly with Supabase, streamlining validation, user sessions, and authentication flows with minimal effort. Additionally, Lovable offers the ability to customize AI-generated forms to meet specific needs.
Step 1: Creating a Supabase Account
To start, you'll need to sign up for a Supabase account by visiting their website and providing your details. Once registered, you’ll be able to access the Supabase dashboard, which allows you to create projects and manage databases. Users needing help with registration can reach out to the support team for assistance.
Step 2: Integrating Account With Lovable
This involves setting up API keys or configuration details in Lovable to allow it to communicate with Supabase. You'll use the API keys provided by Supabase to authenticate Lovable and connect it with your Supabase project.
Step 3: Connecting Supabase With Lovable
Finally, the actual connection between Supabase and Lovable is established. This involves linking Supabase's user authentication system with Lovable's interface. Once connected, Lovable will use Supabase to handle user authentication, store data, and perform other backend processes.
Once the back-end is in place, adding Lovable is an easy process. We need to specify the project credentials, and Lovable will take care of the authentication APIs and token management. Lovable creates very application-appropriate UI components, meaning you could forget about login forms and all that error state. With the workflow for dealing with authentication set-up, you can now concentrate on building the application.
Managing Authentication Workflows With Edge Functions
Step 1: Add a Login Page Using Lovable
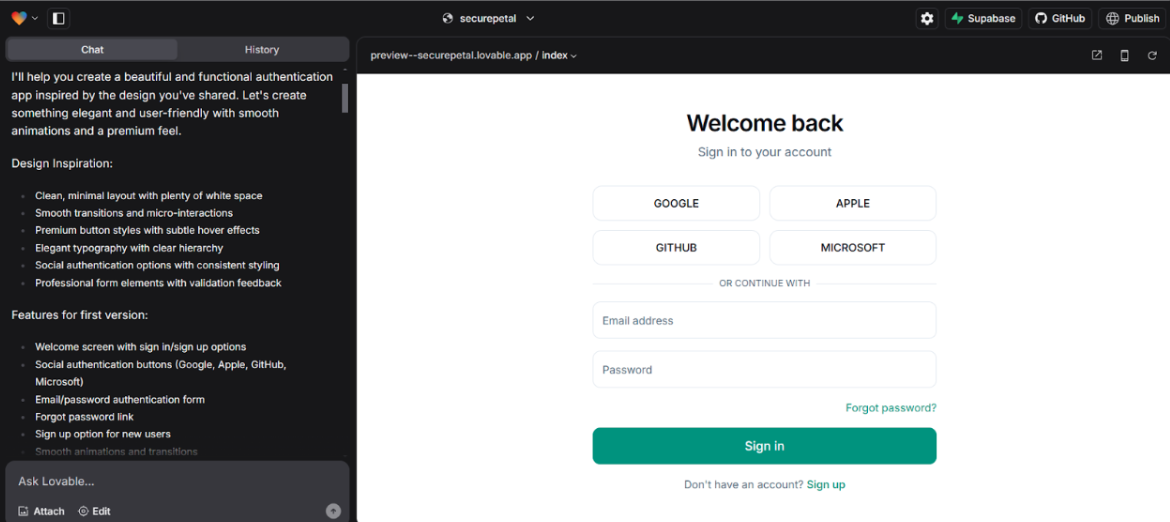
Start by building a clean, intuitive login page with Lovable’s AI form builder, where users can easily enter their credentials. Once the UI is in place, the next step is securing the authentication process with Edge Functions and auth AI, handling logic like token validation and access control, and other security logic. It is also important to collect data and responses in form fields from users to improve the login process.
The prompt provided - “I have attached some reference images to build an authentication application with aesthetic and modern design, with formal colors. It should have a login and sign-in page. With "sign-in if you don't have an account," with a properly integrated backend, by which you will be able to store the user data.”
Step 2: Setting Up Authentication in Supabase Using Edge Functions
After we built the desired user interface using Lovable, now we set up Supabase Edge Functions to handle authentication, validate login details, and generate secure tokens quickly and efficiently.
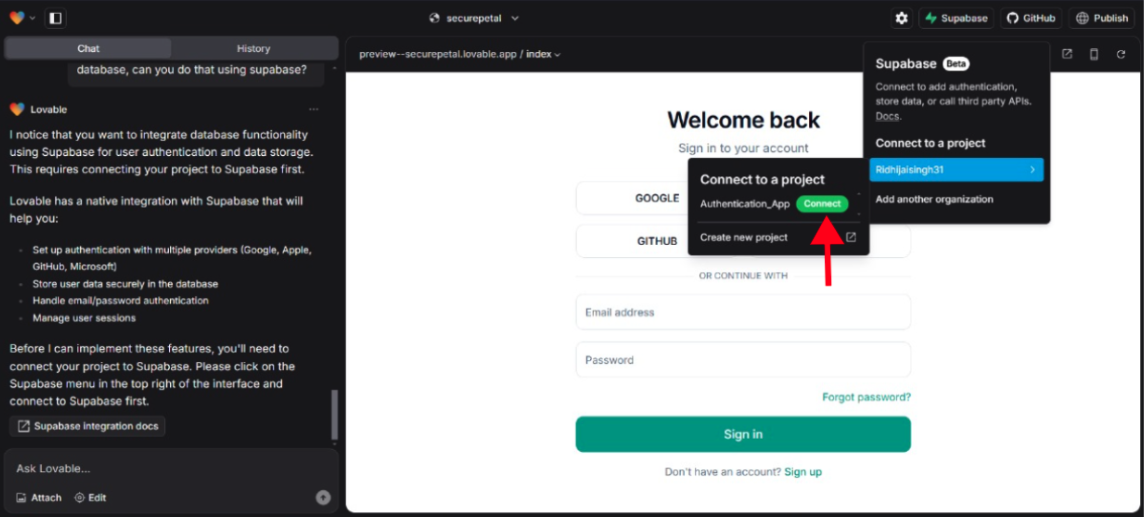
The prompt provided - “Please connect my Supabase project `Authentication_App`”
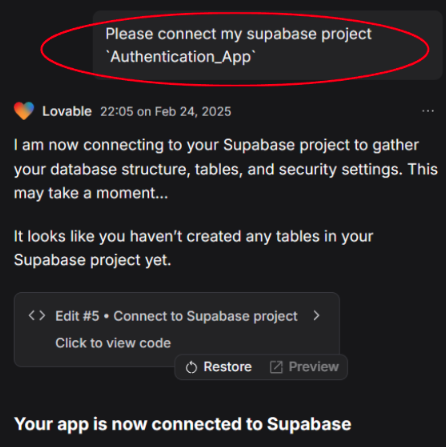
In the above image, a single prompt connected the Supabase project, fetching its database structure and security settings instantly.
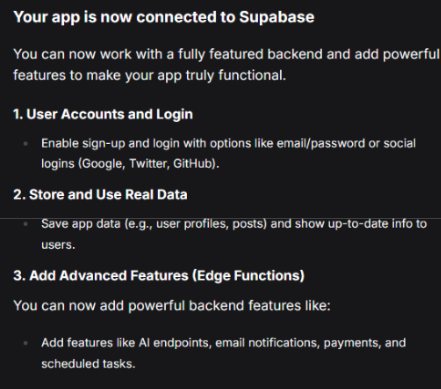
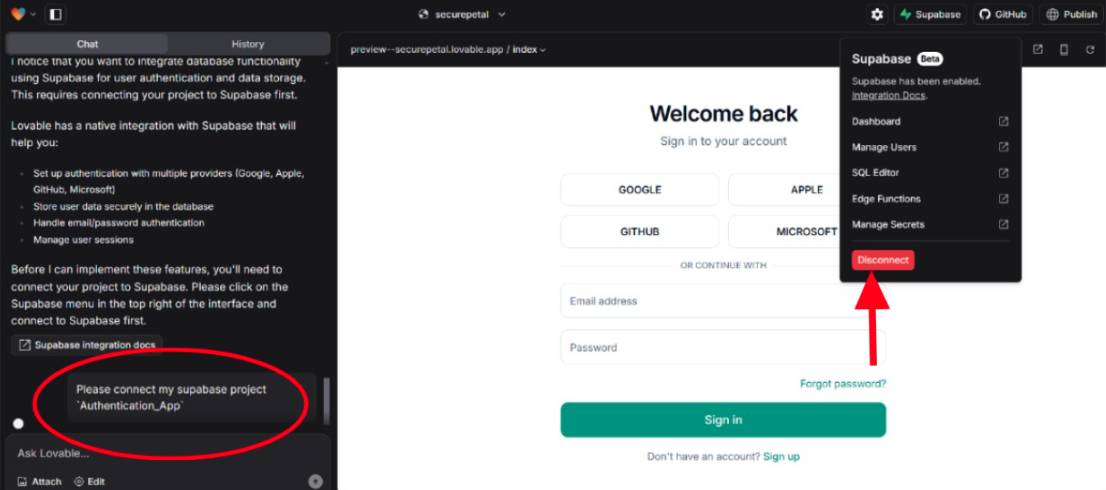
The above image shows a confirmation message that the authentication application is now connected to Supabase, allowing you to set up user AI authentication, store real data, and add advanced features of the backend using Edge Functions.
Step 3: Creating New Users on the Website Using Lovable
The next step is adding a user registration feature in Lovable that sends new user data to Supabase, keeping your database updated with new sign-ups. Lovable simplifies things even more by automating token management and credential storage.

As depicted in the image above, when a new user signs up, Lovable handles email verification automatically—after entering credentials, a prompt asks them to check their inbox for confirmation. If they try signing up again too soon, a security measure kicks in, displaying a timeout message with a 56-second wait before retrying.
In the below image, the user is directed to the dashboard page after sign-up after the email verification.
In the below image, we can see that a user is created in the connected Supabase account with a confirmation email.

The SQL code creates a user profile table with secure access policies, automatically creates a profile upon user signup, and ensures users can only access and modify their profile data.
-- Create a table for user profiles
create table public.profiles (
  id uuid not null references auth.users on delete cascade,
  email text,
  created_at timestamp with time zone default
  timezone('utc'::text, now()) not null,
  updated_at timestamp with time zone default
  timezone('utc'::text, now()) not null,

  primary key (id),
  unique(email)
);

-- Enable RLS
alter table public.profiles enable row level security;

-- Create policies
create policy "Public profiles are viewable by everyone."
  on profiles for select
  using ( true );

create policy "Users can insert their own profile."
  on profiles for insert
  with check ( auth.uid() = id );

create policy "Users can update own profile."
  on profiles for update
  using ( auth.uid() = id );

-- Function to handle new user signup
create function public.handle_new_user()
returns trigger
language plpgsql
security definer set search_path = public
as $$
begin
  insert into public.profiles (id, email)
  values (new.id, new.email);
  return new;
end;
$$;

-- Trigger to automatically create profile on signup
create trigger on_auth_user_created
  after insert on auth.users
  for each row execute procedure public.handle_new_user();
Step 4: Logging in and Logging Out of the Website Using Lovable
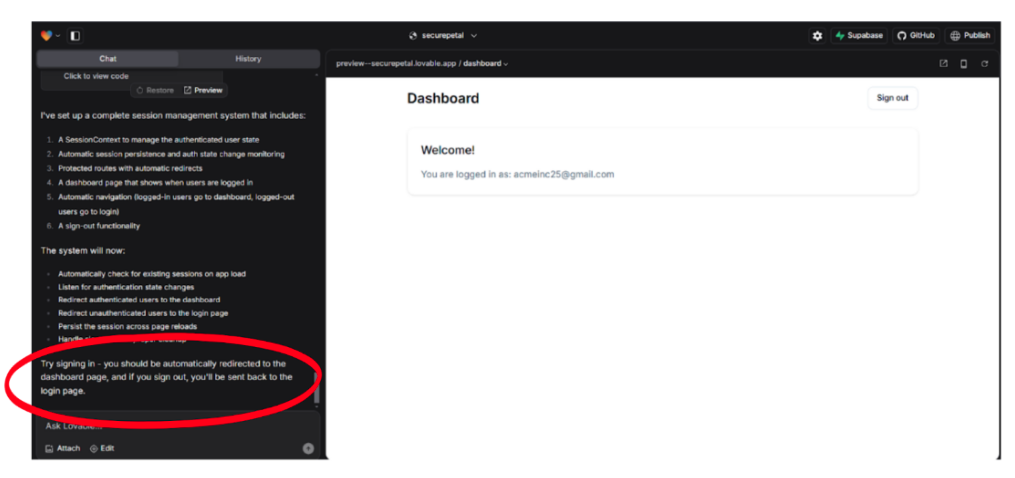
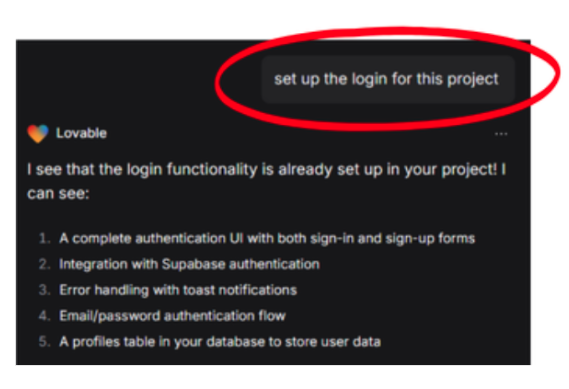
Once users log in, Lovable takes care of session management, keeping them logged in across devices without any extra effort on their part. With sign-ups handled, logging in and out becomes hassle-free. The prompt - “Set up the login for this project.”
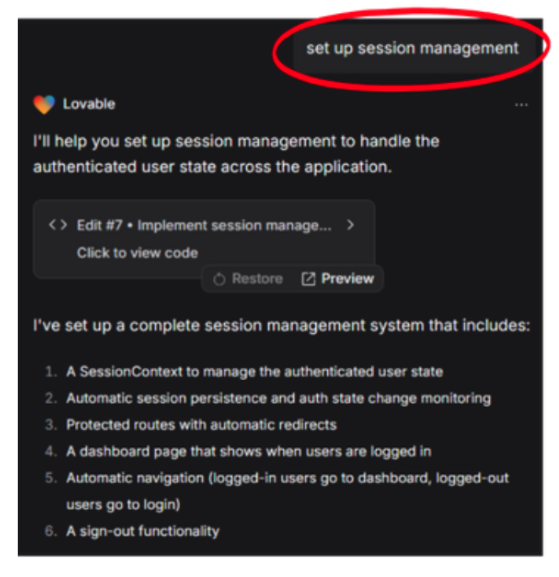
Step 5: Setting Up Session Management Using Lovable
Lovable makes it easy to handle session persistence with secure tokens ensuring users stay logged in safely, and everything is cleared on logout for a smooth, safe experience.
The prompt provided - “set up session management.”
Step 6: Enabling Email Verification for Security in Production
Finally, Lovable helps you implement email verification as an additional security measure. When users sign up, they’ll receive a verification email. Only after they confirm their email address will they be granted access, adding a layer of protection against unauthorized sign-ups.
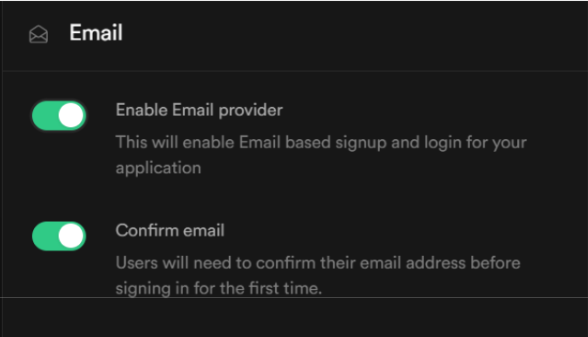
The screenshot above displays the option to enable email confirmation provided by Lovable’s AI authentication, adding an extra layer of security to the authentication process.
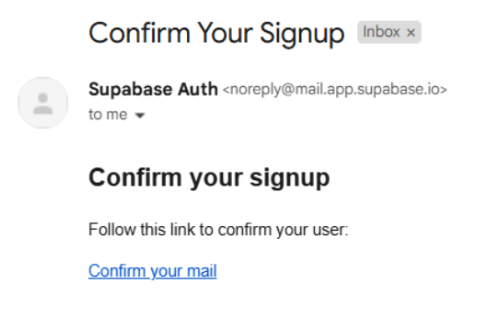
The screenshot above displays the confirmation email triggered upon successful user registration through the sign-up page.
Conclusion
With Lovable AI and Supabase, you’ve got web applications up and running—handling signups, logins, token management, and sessions without the usual headaches. Built-in security features like MFA and email verification keep user accounts safe, while AI form builder and AI form creator capabilities auto-generate AI authentication UIs, eliminating inconsistencies.
Whether you’re kicking off a new project or growing a SaaS business, authentication shouldn’t slow you down. Lovable’s AI form generator streamlines auth AI, generating questions for form creation and making authentication secure, fast, and user-ready.
FAQS
How to Use Lovable AI?
Lovable AI is a versatile and powerful tool for simplifying web development by introducing features driven by AI, helping you integrate authentication, database management, and real-time updates into your application. Here's how to do it:
- Create a new project after signing up with Lovable's platform.
- Set up authentication (with, say, Google OAuth) that allows the user to log in.
- Use Lovable's APIs to manage user sessions, data storage, and role-based access control.
- Integrate AI-powered features like chatbots, recommendations, and data analysis.
- It's for developers who want to build and scale applications quickly without the backend complexity.
Which Authentication is Best for a Web Application?
OAuth 2.0 (Google, GitHub, and Facebook) provides simple access. The stateless authentication of JWT (JSON Web Token) is naturally useful for API-driven apps and SPAs (Single-page Applications). In enterprise apps, a unified manner of access is also needed, while the highest security in areas like banking or healthcare requires multi-factor authentication.
What is the Difference Between SSO and OAuth?
SSO is a process-to-sign-in once for multiple applications, allowing users to log into Gmail and have that decision carried through to Drive and YouTube. In contrast, OAuth lets third parties authenticate users without exposing their credentials. SSO is often underpinned by OAuth, thus enabling smooth access with secure, controlled sharing of data.
What is Authentication in a Web Application?
Web application authentication verifies user identity before granting access, evolving from passwords to JWT, OAuth, and session-based methods. The key is balancing security and usability—encrypting credentials, enforcing MFA, and ensuring seamless logins without compromising user experience.